Deduplication on Windows Server 2012


1. Deduplication is not enabled by default. You must enable it and manually configure it in Server Roles | File And Storage Services | File and iSCSI Services. Once enabled, it also needs to be configured on a volume-by-volume basis.


2. Content is only deduplicated after n number of days, with n being 5 by default, but this is user-configurable.


3. Deduplication can be constrained by directory or file type. If you want to exclude certain kinds of files or folders from deduplication, you can specify those as well.


4. The deduplication process is self-throttling and can be run at varying priority levels. You can set the actual deduplication process to run at low priority and it will pause itself if the system is under heavy load. You can also set a window of time for the deduplicator to run at full speed, during off-hours, for example.


5. All of the deduplication information about a given volume is kept on that volume, so it can be moved without injury to another system that supports deduplication. If you move it to a system that doesn't have deduplication, you'll only be able to see the nondeduplicated files. The best rule is not to move a deduplicated volume unless it's to another Windows Server 2012 machine.


6. If you have a branch server also running deduplication, it shares data about deduped files with the central server and thus cuts down on the amount of data needed to be sent between the two.


7. Backing up deduplicated volumes :

A block based backup solution or a disk image backup method should work as it will preserve all deduplication data.

File-based backups will also work, but they won't preserve deduplication data unless they're dedupe-aware. They'll back up everything in its original, discrete, undeduplicated form. What's more, this means backup media should be large enough to hold the undeduplicated data as well.

The native Windows Server Backup solution is dedupe-aware.


8. The type of data that is being deduplicated plays a major factor in whether it will be better to use native deduplication or backup software deduplication. There are restrictions on the type of data that you can deduplicate using Windows server 2012. The reason for this is that backup software does not usually alter the original data. Instead, it focuses on removing redundancy before the data is sent to the backup server.


Windows Server 2012's deduplication does alter the original data. That being the case, there are some types of data that are poor candidates for deduplication. Specifically, Microsoft recommends that you do not deduplicate Hyper-V hosts, Exchange Servers, SQL Servers, WSUS servers or volumes containing files that are 1 TB in size or larger. The essence of this recommendation is that volumes containing large amounts of locked data (such as a database) or rapidly changing data tend not to be good for deduplication.
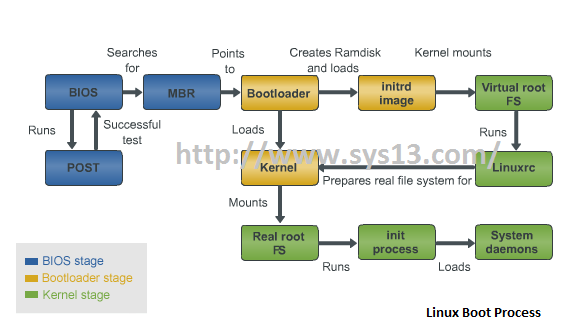
LINUX Boot Process


Linux boot process includes 3 stages:
1. The BIOS Stage
2. The bootloader Stage
3. The Kernel Stage


The BIOS Stage
The Linux boot process starts with the BIOS stage. The basic input/output system, BIOS is a small memory module on the motherboard. It's used during the boot process to initialize a system's hardware components.
The BIOS uses the information stored in the C MOS chip - another memory module on the motherboard that contains information about the system's hardware configuration.

During the boot process, the BIOS tests that all the hardware components on the motherboard are working. This is known as the power-on self-test (POST).


After performing the POST, the BIOS locates the drive or disk from which the OS must be booted. Typically it is configured to attempt to boot from a sequence of different devices in a certain order - so if the first listed device isn't available or doesn't work, the next one can be used. For a drive to be bootable, it must have a Master Boot Record (MBR) in it's first sector which is known as the boot sector. You need to format a disk to add an MBR to it's boot sector. You can also configure a system's hard disk as the primary boot disk and an optical drive as a secondary boot disk. This ensures that you can boot the OS from a removable disk if the main hard disk fails and the computer won't boot normally.

Bootloader Stage
After the BIOS stage, the bootloader stage involves loading two types of pre-cursor software into memory. The first pre-cursor software that's loaded during the bootloader stage provides enough information for the OS to be loaded into memory. The bootloader is usually found in the MBR of the boot disk. After the bootloader is loaded, the CPU can access the disk and memory(RAM). The other pre-cursor software that's loaded during the bootloader stage is an image of a temporary virtual file system called the initrd image or initial RAMdisk. This prepares the system so that the actual root file system can be mounted. It performs steps such as detecting the device that contains the file system and loading required modules. At the end of the bootloader stage, the bootloader loads the kernel into memory.

The Kernel Stage
In the kernel stage, the virtual root file system created by the initrd image runs the Linuxrc program. This program prepares the real file system for the kernel and then dismounts the initrd image.

The Kernel checks for new hardware and loads any required device drivers. If then mounts the actual root file system. Finally, it runs the init process.

The init process uses the parameters in the /etc/inittab file to load the rest of the system daemons. Once this process finishes, you can log in and use the system.

The most common bootloaders for Linux are LILO(Linux Loader) and GRUB (Grand Unified Bootloader). Both these bootloaders enable you to choose which OS kernel to load during boot time.

Storage Devices


Floppy Disks
Solid State Drives or SSDs
Optical Storage Devices
Flash Drives
Hard Disk Drives

Floppy Disks

A floppy disk consists of a thin, oxide-coated magnetic disk that's protected within a hard, plastic shell. They are largely obsolete. They can store a maximum of 1.44 MB per 3.5" disk and have slow data transfer rates.

They are also vulnerable to damage due to environment conditions such as heat and condensation.


SSDs

It uses integrated circuits to store data. It can be used in place of a hard drive. Like a hard drive it uses SATA(Serial Advanced Technology Attachment) interface and block I/O operations

An advantage of SSD over a hard drive is that it doesn't contain any moving parts. This reduces noise and the potential for damage through wear and tear.

It uses non-volatile memory chips that don't lose data when a system's power is off. This technology makes the SSD faster and more energy efficient but more expensive than hard disk.

Optical Storage Devices

CDs, DVDs are examples of Optical Storage Devices.

CDs and DVDs store data in lands and pits. The lands represent 1 and the pits represent 0 in binary computing. The coputer transforms the binary or digital data into user friendly format.

CDs are 1220 mm in diameter and are 1.2 mm thick. They can store up to 700 MB of data/74 minutes of audio content.
Single sided DVD can store up to 4.7 GB of data/120 minutes of audio content. Dual later can store approximately twice the amount of data as single sided DVDs.

Flash Drives

Small, portable, external storage devices that can store a large amount of data. It uses a flash memory chip which does not depend on electric current to retain data.

Hard Disk Drive

A hard disk drive is a computer's main storage device. It consists of multiple platters coated with a magnetic surface material. The drive reads information from these platters and writes information to them.

The speed at which theplatters spin determines how fast the disk reads and writes information. Modern disk speeds range from 4,200 RPM for low power portable drives to 15,000 RPM for high end server-based drives.

3 Types of Hard drives

IDE (Integrated Drive Electronics)
SATA (Serial Advanced Technology Attachment)
SCSI (Small Computer System Interface)


IDE (Integrated Drive Electronics)

A 40-pin, 80-wire ribbon cable connects an IDE drive and other devices to the IDE interface on a computer's motherboard.

Most motherboards with an integrated IDE controller include 2 IDE channels: Primary and Secondary. You can install a master drive and a slave drive on each. Slave drive provide extra storage space or serve as a backup drive.

By default, the master drive on the primary channel is used as the boot drive however you can change this using the CMOS setup program.

You cannot have more than 1 master or slave drives on the same channel.


SATA (Serial Advanced Technology Attachment)

They use a point-to-point connection topology, so that each SATA drive has it's own hard disk channel and bandwidth isn't shared between different devices or controllers. This makes SATA drives faster than IDE drives.

SATA bus uses 2 channels, one for transmitting dataserially bit by bit and another for conforming the reciept of data to the sender.


SCSI (Small Computer System Interface)


External SCSI hard drives connect in a communication chain. Rather than connecting each drive directly to the controller, only the first device connects to the controller and the subsequent SCSI devices connects to the one before it. Using many parallel drives is a benefit of SCSI as it provides constant and reliable access.

The controller has 2 connectors. An internal connector that connects all devices inside a server with a ribbon cable and an external connector connects all external devices to the controller.

Each device in the chain has a unique ID. The SCSI controller uses this ID to send data to the appropriate device. Early controllers supports upto 7 devices plus the controller with IDs 0 to 7. Modern ones supports upto 15 devices plus the controller with IDs 0 to 15. The higher a device's SCSI ID, the higher it's priority.

Installation Error 1935: An error occurred during the installation of assembly.

Error 1935. An error occurred during the installation of assembly

'Microsoft.VC80.MFCLOC,
version="8.0.50727.762",pubicKeyToken="1fc8b3b9a1e18e3b",processorArchitecture="amd64",type="win32"


This is issue occurs when you are trying to install Microsoft Visual C++ Redistributable package or when you are trying to install a software that needs Microsoft Visual C++ binaries.

This is typically the result of missing or corrupt files in the operating system. During the "Registering Product Information" section of the install process the installer "finalizes" the installation of the Microsoft runtime libraries. This finalization may include updates to the Windows Side-by-Side library configuration. In this case the installer is failing while updating the Windows Side-by-Side library configuration.


One of the following solutions must resolve this issue :-

1. Disable the Anti-virus.

2. Open an elavated command prompt and run the following comand:-

fsutil resource setautoreset true C:\

Reboot the system.

The "fsutil" command above will direct the "Transactional Resource Manager" to clean its metadata on the next drive mount.

3. Download and install the latest Msi installer from Microsoft

http://www.microsoft.com/downloads/details.aspx?displaylang=en&FamilyID=5a58b56f-60b6-4412-95b9-54d056d6f9f4

4. This issue may occurs due to the corrupt data store for .netframework. The .NET Framework cleanup tool is available for download at the following locations:

http://cid-27e6a35d1a492af7.skydrive.live.com/self.aspx/Blog_Tools/dotnetfx_cleanup_tool.zip
http://blogs.msdn.com/cfs-file.ashx/__key/CommunityServer-Components-PostAttachments/00-08-90-44-93/dotnetfx_5F00_cleanup_5F00_tool.zip

Save the cleanup log which will tell you what versions of .NET it cleaned and re-install them.

5. Enable the "Windows Modules Installer" service. Ensure that the Windows Installer service is set to "Manual"

6. This error has been observed when the insufficient permissions exist on this folder:

C:\Windows\winsxs\InstallTemp

The minimum needed (and default) permissions are:
Read & execute
List folder contents
Read
Write
Special permissions

7. If you do not find C:\Windows\winsxs\InstallTemp, then create an empty folder in C:\Windows\winsxs\ and name it as "InstallTemp".

8. If none of these works Run chkdsk.

Backup Exec Remote Agent Installation Fails for X and Y issues - A Workaround

Following is a workaround to install Backup Exec Remote Agent on a Windows machine. This is not a fix. There may be times when you cannot install RAWS due to Microsoft issues. For example, when windows installer is corrupted, error 1935, some .NET issues and times when you are left out with no troubleshooting.

TAKE A BACK OF REGISTRY BEFORE PERFORMING ANY REGISTRY CHANGES

You are unable to install the Backup Exec remote agent on SERVER - A for x reasons..

On Server - A

1. Uninstall the existing RAWS if present, Follow the above troubleshooting steps if the uninstallation fails.
2. Confirm to delete C:\Program Files\Symantec\Backup Exec folder.
3. Confirm you delete the following registry entries :
HKEY_LOCAL_MACHINE\SOFTWARE\Symantec\Backup Exec for Windows
HKEY_LOCAL_MACHINE\SYSTEM\CurrentControlSet\Services\BackupExecAgentAccelerator
HKEY_LOCAL_MACHINE\SYSTEM\CurrentControlSet\Services\PDVFSDriver
HKEY_LOCAL_MACHINE\SYSTEM\CurrentControlSet\Services\PDVFSNP
HKEY_LOCAL_MACHINE\SYSTEM\CurrentControlSet\Services\PDVFSService
4. Reboot the server.


5. From another server Server - B which abides the following conditions :-

-Same operating system as the Server - A.
-Same type as Server - A. Both 32 bit or Both 64 bit.
-Must have the Backup Exec remote agent installed and has the latest updates installed.

Copy C:\Program Files\Symantec\Backup Exec folder from Server - B and paste under C:\Program Files\Symantec in Server- A
OR just copy the entire Symantec folder.

6. Export the following registries from Server - B :-

HKEY_LOCAL_MACHINE\SOFTWARE\Symantec\Backup Exec for Windows
HKEY_LOCAL_MACHINE\SYSTEM\CurrentControlSet\Services\BackupExecAgentAccelerator
HKEY_LOCAL_MACHINE\SYSTEM\CurrentControlSet\Services\PDVFSDriver
HKEY_LOCAL_MACHINE\SYSTEM\CurrentControlSet\Services\PDVFSNP
HKEY_LOCAL_MACHINE\SYSTEM\CurrentControlSet\Services\PDVFSService

7.Import them to Server - A:-

8. Reboot Server - A.
9. Once the server boots up you will see that the remote server has been installed.
10. Confirm beremote service and error recording service are on running status.
11. Establish trust relationship. Confirm that the remote agent is publishing the correct IP address or Name.
12. Try running a backup. And it must be successfull.


The above solution will work in any case of remote agent installation failure. Visual C++ runtime redistributable package is a must for beremote service and error recording service to start. Without this package remote agent will not work. Same applies .NET.